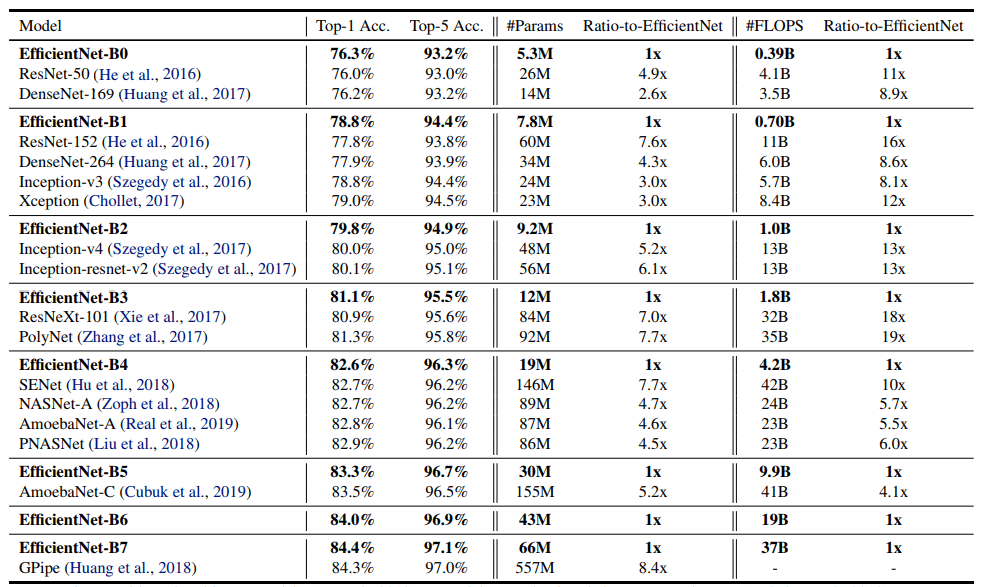
EfficientNet是谷歌AI科学家们在论文《EfficientNet: Rethinking Model Scaling for Convolutional Neural Networks》中提出的模型。这篇文章不仅提出了这个模型,还系统地研究了模型扩展的问题,大家感兴趣的,可用阅读一下论文原文 。EfficientNet的亮眼之处在于,其在保持领先的性能的同时,将模型的参数数量和预测速度都提升了一个数量级。请看下图的性能对比:
这篇文章同时还研究了可迁移性,发现其与我们常用的ResNet,ResNext等等具有类似的可迁移性。看起来EfficientNet完全可以作为新一代的基础模型使用起来呀。
为了提升我们产品(图像分割模型)的识别性能,我们比较系统的研究了这个模型,同时将其转化为了keras的模型,以便我们可以与现有的模型良好的集成起来。下面我们将分享一下我们是如何做的,同时也相信可以给大家提供一个如何在不同框架之间做模型转化的思路。
EfficientNet模型的相关代码和 TPU 训练的模型已在 GitHub 上开源 。本文基于原来的开源代码及模型研究而来。(下面的代码部分请结合官方开源的代码,及代码库 一起阅读)
要实现模型转化,基本上我们要分为这几个步骤来做:
将原来的模型代码翻译为新框架的代码
将原来训练好的模型参数转化为新框架的参数格式
验证转化后的结果是否与原来的一致
下载官方代码之后,我们可以发现官方代码使用tensorflow实现,在tpu下面训练。
我们的目标框架是keras,说起keras,其与tensorflow可以说是有着千丝万缕的联系。首先他们都是出自google,tensorflow还内置了一份keras的代码以便提供更易用的API;其次keras是比tensorflow更早的一个框架,其设计的目标就是统一各个AI框架的API,当然也包括tensorflow;然后keras是没有底层的计算支持的,必须要外接一个后端框架,它的后端除了tensorflow,还支持CNTK, Theano。keras最吸引开发者的一点应该是其设计良好的API,大大提升了我们的开发便利性,这也是我们选择keras的主要原因。
keras与tensorflow我们可以认为具有非常好的兼容性,一是由于官方支持,二是由于keras的后端就可以是tensorflow。这给我们的转化提供了很大的便利。
如何开始呢?让我们先准备一个测试让原来的模型可以跑起来。从官方的例子来看,文件eval_example_images.py中的eval_example_images函数就是让模型跑起来的代码了。由于我们要提取核心代码进行转换,我们进一步分析之后,抽丝剥茧,可以得到这样几行代码:
1
2
3
4
5
6
7
8
9
10
11
12
13
14
15
16
17
18
19
20
21
22
23
24
25
26
27
28
29
30
31
32
33
34
35
36
37
38
39
40
41
42
43
44
45
46
def softmax (x ): exp_x = np.exp(x) softmax_x = exp_x / np.sum (exp_x, axis=1 ) return softmax_x def test_run_tf_model (): import pickle x = pickle.loads(open ('data/x.pickle' , 'rb' ).read())[0 ] with tf.Graph().as_default(), tf.Session() as sess: model_name = 'efficientnet-b0' X = tf.cast(tf.stack([x]), dtype=tf.float32) X -= tf.constant(MEAN_RGB, shape=[1 , 1 , 3 ], dtype=X.dtype) X /= tf.constant(STDDEV_RGB, shape=[1 , 1 , 3 ], dtype=X.dtype) with tf.variable_scope(model_name): blocks_args, global_params = efficientnet_builder.get_model_params(model_name, None ) model = efficientnet_model.Model(blocks_args, global_params) _logits = model(X, False ) model.summary() sess.run(tf.global_variables_initializer()) checkpoint = tf.train.latest_checkpoint('data/models/{}' .format (model_name)) ema = tf.train.ExponentialMovingAverage(decay=0.9999 ) ema_vars = tf.trainable_variables() + tf.get_collection('moving_vars' ) for v in tf.global_variables(): if 'moving_mean' in v.name or 'moving_variance' in v.name: ema_vars.append(v) ema_vars = list (set (ema_vars)) var_dict = ema.variables_to_restore(ema_vars) saver = tf.train.Saver(var_dict, max_to_keep=1 ) saver.restore(sess, checkpoint) logits = model.predict(X, steps=1 , batch_size=1 ) pred_probs = softmax(logits) pred_idx = np.argsort(pred_probs)[:, ::-1 ] pred_prob = np.array([pred_probs[i][pid] for i, pid in enumerate (pred_idx)])[:, :5 ] pred_idx = pred_idx[:, :5 ] classes = json.loads(open ('data/labels_map.txt' , 'r' ).read()) print ('predicted class for image {}: ' .format ('data/panda.jpg' )) for i, idx in enumerate (pred_idx[0 ]): print (' -> top_{} ({:4.2f}%): {} ' .format (i, pred_prob[0 ][i] * 100 , classes[str (idx)]))
这里的模型恢复参数时用到了一个奇怪的ExponentialMovingAverage,看起来不用这样的方式也可以,但是由于官方代码是这样的,为节约时间,我们姑且先按照官方的例子做。有兴趣的小伙伴们可以研究一下是否能把这一步去掉。
这里的x.pickle文件是我们从原来的模型运行中导出来的,在eval_example_images.py文件中的EvalCkptDriver.run_inference函数中,代码行probs = self.build_model(images, is_training=False)之后加入代码import pickle;_images = sess.run(images);pickle.dump(_images, open('data/x.pickle', 'wb'))后运行,即可导出此文件。这里我们没有直接将图片输入到模型中进行预测,因为原模型对输入图像做了一定的预处理,如果我们忽略预处理,则将得到不一样的结果。
运行上面的函数之后,就可以发现得到了与官方一样的结果,如下:
1
2
3
4
5
6
predicted class for image data/panda.jpg: -> top_0 (82.79%): giant panda, panda, panda bear, coon bear, Ailuropoda melanoleuca -> top_1 (1.52%): ice bear, polar bear, Ursus Maritimus, Thalarctos maritimus -> top_2 (0.37%): lesser panda, red panda, panda, bear cat, cat bear, Ailurus fulgens -> top_3 (0.23%): American black bear, black bear, Ursus americanus, Euarctos americanus -> top_4 (0.17%): brown bear, bruin, Ursus arctos
下一步我们来构建自己的keras模型,我们知道keras的模型分为两类,一类是顺序连接的模型,一般构造一个keras.models.Sequential对象,然后依次加入不同的层就行,参考这里 ;另一类是图模型,通过函数式的API来构建,参考这里 。由于EfficientNet的模型是一个比较复杂的网络,这里应该用函数式API构建为一个图模型。
先构建一个简单的测试如下:
1
2
3
4
5
6
7
8
9
10
11
12
13
14
15
16
17
18
19
20
21
22
23
def test_load_weights (): from eval_ckpt_main import MEAN_RGB, STDDEV_RGB X = pickle.loads(open ('data/x.pickle' , 'rb' ).read()) X = np.array(X, dtype=np.float32) X -= np.array(MEAN_RGB, dtype=np.float32).reshape((1 , 1 , 3 )) X /= np.array(STDDEV_RGB, dtype=np.float32).reshape((1 , 1 , 3 )) model_name = 'efficientnet-b0' model = EfficientNetModelBuilder().build(model_name, input_shape=(224 , 224 , 3 ), num_classes=1000 ) model.summary() model.load_weights('data/converted_weights/{}_imagenet_1000.h5' .format (model_name)) Y = model.predict(X) pred_probs = softmax(Y) pred_idx = np.argsort(pred_probs)[:, ::-1 ] pred_prob = np.array([pred_probs[i][pid] for i, pid in enumerate (pred_idx)])[:, :5 ] pred_idx = pred_idx[:, :5 ] classes = json.loads(open ('data/labels_map.txt' , 'r' ).read()) print ('predicted class for image {}: ' .format ('data/panda.jpg' )) for i, idx in enumerate (pred_idx[0 ]): print (' -> top_{} ({:4.2f}%): {} ' .format (i, pred_prob[0 ][i] * 100 , classes[str (idx)]))
这里构建这个测试是很重要的,这个测试就像一个灯塔,有了它我们的目标就非常明确了,只要这个测试能输出跟原模型同样的结果,就证明我们的模型转化是正确的。
新建一个EfficientNetModelBuilder类及build方法。做代码迁移的第一步是参数的构造,原模型的参数由于要同时支持不同的模型及不同的图像大小、网络宽度、网络深度,对参数进行了一定的编码。为了容易理解我们建立以下三个类来与原来的代码对应:
EfficientNetGlobalParams -> GlobalParams (efficientnet_model.py)EfficientNetParams -> efficientnet_params (efficientnet_builder.py)EfficientNetBlockParams -> BlockDecoder (efficientnet_builder.py)
并将相应的参数解析,验证等操作封装到这三个类中。
参考官方代码,我们新建对应的MBConvBlock及EfficientNetModel类,然后将tensorflow的实现替换为keras的实现。
这里需要注意的是,分析官方的代码发现模型的构建分为两步_build及call,前者构建相关的层,后者将各层连接起来。我们这里修改一下方法名字,建立对应的两个方法_build_layers和_connect_layers。由于这里模型的构造直接通过构造器完成,我们无需对外暴露任何的方法,全部申明为内部方法。
接下来就是代码的改写了,将官方代码拷贝过来,然后用keras的API重写一下。主要的改写在下面几个方面:
将tf.layers.Conv2D改为keras.layers.Conv2D,并修改对应的参数名,参数值
将一些tensorflow函数封装为keras的层,然后替换原来的函数调用。如:
a. 原来的函数调用se_tensor = tf.reduce_mean(input_tensor, self._spatial_dims, keepdims=True)可以改为_build_layers方法中的self._se_mean = keras.layers.Lambda(name=self._layer_name('se_mean'), function=lambda x: tf.reduce_mean(x, self._spatial_dims, keep_dims=True))及_connect_layers中的se_tensor = self._se_mean(input_tensor)调用swish激活函数,可以新建一个继承至keras.layers.Layer的Swish类来实现drop_connect函数,可以新建一个继承至keras.layers.Layer的DropConnect类来实现
batchnorm修改为keras的版本keras.layers.BatchNormalization
修改完毕之后,注释掉上面测试中的model.load_weights一行,运行测试,应该不会报错,但是由于我们还没有导入参数,上面的测试会随机输出一个结果。到这里模型翻译的部分就完成了。
第二个问题就是如何导出原来模型的参数,并导入我们的新模型中了。
从我们最初的那个运行原模型的测试来看,下面几行代码就可以得到原模型的所有保存的参数:
1
2
3
4
5
6
7
8
ema = tf.train.ExponentialMovingAverage(decay=0.9999 ) ema_vars = tf.trainable_variables() + tf.get_collection('moving_vars' ) for v in tf.global_variables(): if 'moving_mean' in v.name or 'moving_variance' in v.name: ema_vars.append(v) ema_vars = list (set (ema_vars)) var_dict = ema.variables_to_restore(ema_vars) print (list (var_dict.keys()))
这里得到的参数是什么呢?我们可以简单的将其名字输出到控制台,得到以下这些参数名:
1
2
3
4
5
6
7
8
9
10
11
12
13
14
15
efficientnet-b0/blocks_0/conv2d/kernel/ExponentialMovingAverage efficientnet-b0/blocks_0/depthwise_conv2d/depthwise_kernel/ExponentialMovingAverage efficientnet-b0/blocks_0/se/conv2d/bias/ExponentialMovingAverage efficientnet-b0/blocks_0/se/conv2d/kernel/ExponentialMovingAverage ... efficientnet-b0/head/dense/kernel/ExponentialMovingAverage efficientnet-b0/head/tpu_batch_normalization/beta/ExponentialMovingAverage efficientnet-b0/head/tpu_batch_normalization/gamma/ExponentialMovingAverage efficientnet-b0/head/tpu_batch_normalization/moving_mean/ExponentialMovingAverage efficientnet-b0/head/tpu_batch_normalization/moving_variance/ExponentialMovingAverage efficientnet-b0/stem/conv2d/kernel/ExponentialMovingAverage efficientnet-b0/stem/tpu_batch_normalization/beta/ExponentialMovingAverage efficientnet-b0/stem/tpu_batch_normalization/gamma/ExponentialMovingAverage efficientnet-b0/stem/tpu_batch_normalization/moving_mean/ExponentialMovingAverage efficientnet-b0/stem/tpu_batch_normalization/moving_variance/ExponentialMovingAverage
我们的keras的模型参数名是什么呢?由于keras的模型全部由一个一个的层组成,我们可以直接打出每一层里面的参数,代码如下:
1
2
3
4
5
def print_keras_model_weights (model ): layers: List [keras.layers.Layer] = [layer for layer in model.layers if layer.weights] print ('weights count in model: ' , sum ([len (layer.weights) for layer in layers])) for layer in layers: print ('layer: {}, names: {}' .format (layer.name, [w.name for w in layer.weights]))
这里同时也打印出了所有的参数个数,我们可以与之前原模型的参数数量比较一下以验证我们的做法的正确性。我们可以得到这样的参数:
1
2
3
4
5
6
7
8
9
10
block_1_1_depthwise_bn: ['blocks_0/block_1_1_depthwise_bn/gamma:0', 'blocks_0/block_1_1_depthwise_bn/beta:0', 'blocks_0/block_1_1_depthwise_bn/moving_mean:0', 'blocks_0/block_1_1_depthwise_bn/moving_variance:0'] block_1_1_depthwise_conv: ['blocks_0/block_1_1_depthwise_conv/depthwise_kernel:0'] block_1_1_project_bn: ['blocks_0/block_1_1_project_bn/gamma:0', 'blocks_0/block_1_1_project_bn/beta:0', 'blocks_0/block_1_1_project_bn/moving_mean:0', 'blocks_0/block_1_1_project_bn/moving_variance:0'] block_1_1_project_conv: ['blocks_0/block_1_1_project_conv/kernel:0'] ... head_bn: ['head/head_bn/gamma:0', 'head/head_bn/beta:0', 'head/head_bn/moving_mean:0', 'head/head_bn/moving_variance:0'] head_conv: ['head/head_conv/kernel:0'] head_dense: ['head/head_dense/kernel:0', 'head/head_dense/bias:0'] stem_bn: ['stem/stem_bn/gamma:0', 'stem/stem_bn/beta:0', 'stem/stem_bn/moving_mean:0', 'stem/stem_bn/moving_variance:0'] stem_conv: ['stem/stem_conv/kernel:0']
下一步要做的就是将参数与原模型的参数建立映射了。比较参数名,做相应的名字替换,我们可以得到这样的替换逻辑:
1
2
3
4
5
6
7
8
9
10
11
12
13
14
15
16
17
18
19
20
def map_weight_key (model_name: str , keras_key: str ) -> str : key = keras_key\ .replace('stem_conv' , 'conv2d' ).replace('stem_bn' , 'tpu_batch_normalization' )\ .replace('head_conv' , 'conv2d' ).replace('head_bn' , 'tpu_batch_normalization' ).replace('head_dense' , 'dense' )\ .replace('block_1_1_depthwise_bn' , 'tpu_batch_normalization' ).replace('block_1_1_depthwise_conv' , 'depthwise_conv2d' )\ .replace('block_1_1_project_bn' , 'tpu_batch_normalization_1' ).replace('block_1_1_project_conv' , 'conv2d' )\ .replace('block_1_1_se_reduce_conv' , 'conv2d' ).replace('block_1_1_se_expand_conv' , 'conv2d_1' )\ .replace(':0' , '' ) match = re.match(r'.*block_(\d)_(\d)_' , keras_key) if match is not None : block_idx, sub_block_idx = tuple (map (int , match.groups())) block_prefix = 'block_{}_{}' .format (block_idx, sub_block_idx) if not (block_idx == 1 and sub_block_idx == 1 ): key = key.replace('{}_expand_bn' .format (block_prefix), 'tpu_batch_normalization' ).replace('{}_expand_conv' .format (block_prefix), 'conv2d' )\ .replace('{}_depthwise_bn' .format (block_prefix), 'tpu_batch_normalization_1' ).replace('{}_depthwise_conv' .format (block_prefix), 'depthwise_conv2d' )\ .replace('{}_se_reduce_conv' .format (block_prefix), 'conv2d' ).replace('{}_se_expand_conv' .format (block_prefix), 'conv2d_1' )\ .replace('{}_project_bn' .format (block_prefix), 'tpu_batch_normalization_2' ).replace('{}_project_conv' .format (block_prefix), 'conv2d_1' )\ return '{}/{}/ExponentialMovingAverage' .format (model_name, key)
输入keras的模型参数名,即可得到对应的原模型的参数名。有了参数转换逻辑,下面我们就可以开始转换参数了。
首先是将原模型的参数导出,我们可以在第一个测试里面加入下面这些代码,然后运行:
1
2
vars = dict ([(name, sess.run(var)) for name, var in var_dict.items()])pickle.dump(vars , open ('data/{}.params.pickle' .format (model_name), 'wb' ))
然后就是参数导入到keras模型了,代码如下:
1
2
3
4
5
6
7
8
9
10
11
12
13
def load_weights (model: keras.Model, pickle_weights_dir: str ): vars_dict: Dict [str , np.ndarray] = pickle.loads(open ('{}/{}.params.pickle' .format (pickle_weights_dir, model.name), 'rb' ).read()) print ('weights count in tensorflow model: ' , len (vars_dict)) layers: List [keras.layers.Layer] = [layer for layer in model.layers if layer.weights] print ('weights count in keras model: ' , sum ([len (layer.weights) for layer in layers])) weight_value_tuples = [] for layer in layers: for w in layer.weights: print (w.name) key_in_pickle = map_weight_key(model.name, w.name) weight_value_tuples.append((w, vars_dict[key_in_pickle])) keras.backend.batch_set_value(weight_value_tuples)
将我们第二个测试里面的代码行model.load_weights('data/converted_weights/{}_imagenet_1000.h5'.format(model_name))替换为load_weights(model, 'data'),然后运行,就可以得到和官方一样的结果了。
至此我们的模型转换就基本上完成了,还剩下一个简单的步骤,将这个模型的参数保存为h5格式,这个用model.save_weights就可以实现。保存为h5格式之后,我们就可以完全脱离官方的代码来工作了,后续就可以方便的集成到我们自己的工作中。
其实这里还遗留了一个任务没有完成。我们平时使用基础模型,一般不会保留head块,这一块用于最后的分类输出,是依赖于分类数量的,每个任务都可能不一样。去掉head块的任务,有兴趣的小伙伴们可以自己动手实现一下。
